The adventure of trying to make a house a home that we built for our family of six plus some craft, home décor, recipes & any family fun we might have.

Friday, 11 October 2013

DIY Heaven

I've been thinking about creating a chalkboard menu planner for a few months now and after visiting Pinterest I knew it was something I wanted to in stall in our kitchen. Originally I fell in love with these two chalkboards and they were the inspiration behind wanting to have a chalkboard in the kitchen.
both projects can be found here and here
Originally my plan was to purchase 7 MDF clipboards, plaint them up with blackboard paint, label them with days of the week and then hang them on the wall beside the pantry. Once hung I'd be able to write down what we'd be eating each week. After searching on-line I discovered that I couldn't get a clipboard under $3 a piece so I went around town trying to find a cheap clipboard. I found some good ones at Officeworks but at $3.48 each it was going to cost me just over $24 and that was before I purchased anything else to finish off the project.


I really liked the clip on these boards but I didn't like them enough to pay what they were asking. So after weeks of looking and finding clipboards that were more expensive I'd started to give up on my dream. Then last weekend we went off to Bunnings to look for a garden fence as we need to place a few on the sides of the house to keep the children in the backyard. About an hour later I walked out of Bunnings with a few vegetable seedlings, some decorative trim, liquid nails and a 1200 by 900 piece of MDF. I'd gotten the idea of creating my own framed blackboard and that's all it took.
 
Later that afternoon I sent Mr Opoes off to his fathers place so that he could cut the trim with 45° angles. The only power tool we currently own is an electric drill so I was happy that my father in-law was able to help us out with this project. I'm now looking forward to getting this project underway this weekend as I'd love to have it hanging on my wall by the end of the month. My to-do list is growing everyday as I'm getting some really interesting ideas BUT they might have to wait a while as I have to save the money first to fund the project.
 
So what are your plans for the weekend? I'm hoping to get a few projects started, do a bit of cooking and to spend time playing with the children. Fingers crossed I get something crossed off my list this weekend :)
 
Megan

Thursday, 10 October 2013

Banana and Strawberry Muffins

Over the last few months I've realised that I haven't baked any special treats for the kid's lunches, so yesterday I jumped into the kitchen to make some yummy muffins for the kid's lunch boxes. I like my time in the kitchen as it's relaxing and I get to escape what's going on in the house. However, as I made the muffins before the kid's morning nap I had three eager and willing helpers standing on their chairs watching me like hawks. I allowed them to help get some of the ingredients out of the pantry, throw the egg shells and carton in the rubbish bin and lastly I let them do the hardest job lick the beaters and spoon. They licked them so clean that it didn't even look like I'd used them to do any cooking.


Banana and Strawberry Muffins
Ingredients
150g softened butter
1 teaspoon vanilla essence
¾ cup castor sugar
2 banana's peeled
100g strawberries, cut into quarters
2 eggs
1½ cups plain flour
3 teaspoons baking powder
¾ cup milk

Method
1. Preheat oven to 180°C and prepare muffin tin with patty liners.
2. Cream butter, vanilla and sugar until light and fluffy.
3. Add eggs one at a time, beating well after each addition.
4. Add banana's and strawberries, mix well.
5. Sift flour and baking powder together. Fold into creamed mixture.
6. Add sufficient milk to give a soft dropping consistency (you want to be able to spoon the mixture into your pan easily).
7. Spoon enough mixture into your liners so that they are three quarters filled.
8. Bake for 20-25 minutes making sure that they are cooked in the centre. Leave in tray for 10 minutes before placing them on a wire rack.
9. When cool decorate with icing.

I iced a few of these for Mr Opoes but I left the muffins plain for the children because when packing them into lunch boxes the plastic wrap tends to remove the icing making it messy to eat. I prefer mine plain with a little butter however I don't get many opportunities to eat them because the other hungry monkey's eat them before I get a chance. The kids love these so much I might get into the kitchen over the weekend and do more baking.

Megan


Tuesday, 8 October 2013

Handmade Birthday Cards

Yesterday was the last day of the school holiday's and I'm happy to say that I haven't heard I'm bored once during the two weeks that they've been off school and kindy. Last week the kids and I took a trip to Bribie Island for a few hours of fun, playing in the sun, relaxation, shopping and eating fish and chips. Having visited the area previously I wanted to call into the local craft store as they have a huge range of paper and accessories that makes it idea to find craft supplies that are ideal for the kid's to use and the price is good. After talking it over with the children they decided they wanted to make some birthday cards.
 
As soon as they'd gone to bed I got onto Pinterest and I started pinning cards that I thought would be easy to do with the kids. The following day I asked each of the kids to choose two designs they liked, I then set about collecting all the materials needed and I went about taping all the pieces so that the kids could just stick them down. This method worked well with the girls due to their ages, they're five and three BUT I think that I could have just given Caelan pieces of information and he could have worked on it himself. He worked well and he got both his cards done relatively quick due to the simplicity of the cards he chose.
 
So with the younger two down for their daytime sleep I set to work getting the older two working on their cards.  It was fairly simple giving each of them directions and it also helped having the laptop set up so that they could see were they wanted to place their papers.

Unfortunately, Caelan and I fell that the cards he's made a more suitable for younger boys and won't really be good to give out next year to his mates. This won't be too much of an issue as it just means that we can work on making more masculine cards over the Christmas holidays. Caelan's already put in a request to make a few Christmas cards for his friends, teacher and family members so I'm looking forward to working on that project with him in the coming weeks.
Viveca and I worked really well together on her card as she was good at following my directions and this made it quiet simple to put her card together. I got Viveca to choose the paper she wanted to use for the star and circle because her card was really colourful and having her pick the colours turned into an educational opportunity. Although she isn't good at saying her colours she did a really good job with the ones she picked and this is her card. The other thing she did well at was pressing down on the stamp, hers was clear and I was impressed especially as I didn't think I'd inked the stamp too well.
So after putting a bit of effort into the cards over the course of two days the children have created six birthday cards. When I added the cost of all the supplies minus some of the embellishments because I already had them each card ended up costing $0.96. I can't buy a handmade card anywhere for that price and I still have six cards left to decorate which will reduce the overall price again. So for about seven hours work I am happy with the cards the kids have made.
 
Best of all the kids will have a card to take to the next birthday party they get invited to and there won't be another card like theirs which is always a winner. I will definitely be doing this again with the kids next school holidays, maybe next time they can design their own cards and I'll just help with the taping side of things.
 
Here are the finished cards that the kids made.
Viveca's Cards
Mackenna's Cards

Caelan's Cards
So tell me do you make your own cards or do you buy a card from the shop when you're purchasing the present. Mummy is hoping that the kids all make me a birthday card next year because I'd love to have one of these given to me on my special day.
 
Megan

Thursday, 3 October 2013

Pantry Organisation

When we decided to build our home I was really excited that I'd be able to make changes throughout the original house plan thus making it OUR design and our family home. One of the areas I spent a lot time on was the kitchen and the adjoining butlers pantry. Our previous house had a five shelf pantry that was about the same height as a refrigerator and I was forever getting frustrated as I never seemed to have enough room to store things other than food. So I really wanted a pantry space in this house that would allow me to store food, containers, special items and things that I don't want my nearly two year old to get to.
 
During one of our many visits to the house during construction my brother's girlfriend asked me what the small room at the other end of the kitchen was. I told her that it was a linen cupboard that I could use to store things that didn't fit in other area's of the house, she suggested that I use it as another pantry as that would allow me to store more food and possibly reduce the number of times I had to shop during the year. The reason for having this space was because I've always believed Australian homes don't have enough storage within the house for families. Nowadays builders seem to be providing us with even less storage options than what they provided twenty-five years ago when my parents were building their home.
 
After listening to her idea, Mr Opoes and I went back to our rental house and spoke about what she had suggested. Having decided to use it as a linen cupboard was OK but technically it was in the wrong position and as we already have a large area in the laundry to store our linen it just made sense. If I'd been honest with her I would have told her that I'd always had a problem with the cupboard been off the kitchen and it wasn't possible to change the position of door due to the nearby rooms. So with a few months left of the build I got to thinking which space would be to store my food and which would be used to store my Tupperware, special items, containers etc.
 
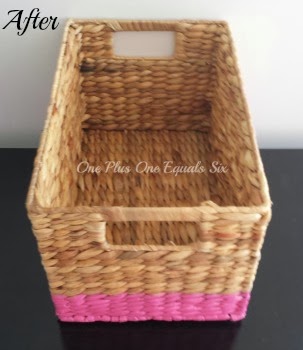
Recently I watch Quinlan playing with all my plastic containers and that's when I got to thinking that I needed to create a storage solution to look after the growing collection of plastics and Tupperware that I've accumulated over the years. So with this in mind I got to thinking about what I could create and where I'd like to position my plastic and Tupperware collection. I purchased a few weaved baskets from my local Kmart store and a can of PlastiKote spray paint from the hardware store.


I wanted a hot pink colour and I fell in love with the colour of the lid so I was really surprised to find out that the colour I'd chosen was called Heather Violet but I must admit it's a really nice colour if done in moderation.
So this is what I came up with. I undercoated a small section of each basket, left it to dry for the required time and then I sprayed it pink. I had to spray it twice with the pink so that I could get into all the uneven spaces that each basket has. I then left it to dry for 48 hours just to make sure it was really, really dry. Lastly I stuck four one inch felt pads on the bottom of the basket so that it wouldn't mark the bottom of my pantry shelves. I haven't completely finished the baskets yet as I'm still waiting for Mr Opoes to drill holes into my chalkboard labels so that I can use the large tin of chalkboard paint I have.
 

I'm going to say that these new storage containers will save my plastics from disappearing, I'll be able to match them up when I use them and they'll be up high enough that my four lovely children won't be reaching up to steal them time and time again. It'll also help heaps next year when I have three children attending various educational locations so that means I should have more room for lunch boxes and drink bottles. So do you have a special storage trick that you use to keep all your plastic container under control. I'd love to hear about it as I'm desperate to get our house de-cluttered and organised before the year's finished.
 
Megan

Wednesday, 2 October 2013

How to design a furniture layout that's perfect for any space.


Over the years I've learnt that it can be very costly and frustrating choosing furniture. You get it home only to discover that it's too big or small for the space that you're working within. Our previous house was a great starter home but with a growing family the room sizes were on the small size, thus making it easy to clutter up a room with the wrong pieces of furniture.

I learnt very quickly with our first home that it was important to get it right the first time because it could be a long and difficult process if you got it wrong. We had a neighbour across the street who's house was a mirror image of ours and when I visited her I'd always look at how she'd arranged her furniture so that I could try it out at our place. I remember that she never had a lounge suite in the front formal room which we were using as a living and craft room. It was all because she couldn't find the right lounge suite to fit into the long narrow space. It took her five attempts before she got something that worked but she never really loved how it looked in the space and I think that was because she just settled. It had become too tiring bringing lounges in and out of her house only to discover that they were so wrong in that space. With this in mind that's why I use my method when needing to purchase furniture for any room in our house.

I've been looking to purchase some new furniture for our dining room and living room ever since we moved into our house sixteen months ago. During this time I've been putting money aside, especially as I've wanted to purchase good quality items due to the short life of our previous items. There are a number of steps I use during the process to choose furniture for a particular room. I've found that they work really well for me and I hope they might help you next time you're looking to purchase furniture for a particular room. These are the steps I followed when I recently purchased our new lounge and dining table. You can also use this process when purchasing rugs or art.

1. When I'm interested in purchasing furniture I like to spend time looking at the furniture, sitting on it, touching it, watching how the children use it and generally making sure that it was something we'd need and use. I also make sure I get the measurements for each piece either from the store or online.

2. I take lots of photographs of each piece when I'm in store so that I can show them to Mr Opoes to get his thoughts and opinions. If the items are online I'll show them to Mr Opoes and again we'll talk. This process allows me to get a feel for what he wants and I'll even take him to the store so that he gets a feel for each piece and he can eliminate something because it's wrong for his frame, height etc.

3. When we get home I take out my painters tape and I start measuring up the space it'll occupy. This is particularly helpful if I'm purchasing a dining table, 2 seater lounge, 3 seater lounge, king single bed, single bed and the list goes on. The best part about taping out the size of the furniture is it stops you from making a big mistake when you're in the store. If you're interested in two different sized dining tables its best to tape them out with different coloured painters tape.


4. If other pieces of furniture need to move then move them to get a feel for how the pieces will work within the room. We're a family of six so originally I wanted to purchase two 3 seaters but with each measuring 2.52 metre (8 feet 3732 inches) long I just couldn't make it work within the space. During the process of placing the tape on the floor you can step back and see what will fit and what doesn't fit.


5. Then it's back to the furniture store or online to place your order. This whole process would have usually taken me two days to complete but with it being school holidays I had to work around the kid's activities and their pain threshold for furniture shopping. 

As you can see from my photographs I chose the one day that it was overcast and wet to take my money shots. It's a pity I didn't hear the weather forecast the night before as it would have helped with the photos I took. Now to delete the sixty photos I still want people to think I'm a professional photographer ha ha. Now we should receive our new furniture by the first week of November so I'm hoping that all this preparation pays off especially as the lounge is getting made in the fabric I chose.

When it arrives I'll share progress photos minus the overcast weather so you can see how the room looked before and after. I'd love to hear how you go about choosing furniture for rooms that you're decorating. Tomorrow I'm going to share with you how I'm thinking of organising my Tupperware and other plastics in my pantry as the children are stealing it and hiding playing with it.

Megan

Friday, 27 September 2013

6 Steps for a Successful Trip to the Movies with Young Children.

In my little part of the universe it's school holidays, this means that I have two weeks to fill with fun, food, activity and excitement. In order to achieve these goals I need to have planned something FUN to do for every day. And as you would have guessed I haven't planned anything FUN or EXCITING for the children as the holidays sort of snuck up on me.

So it was great when my mother (Oomie) asked to take Caelan for a week because at the moment he really wants some one on one time and with three other siblings it's extremely difficult to give him that time. So while he's away I know he'll be going to the movies with his uncle which means he'll talk non-stop about the movies when he gets home and this will upset his sisters. So with this in mind I took the girls to see The Smurfs 2. My girls are 5 and 3½ years old and this means that I have to work within certain limits otherwise a trip to the cinema can go horribly wrong. So here are my 6 steps to a successful trip to the movies.
Source
1. Purchase your tickets on-line.
Until yesterday I'd never purchased a movie ticket on-line so I was somewhat surprised when I had 10 minutes to complete my transaction. My local cinema had charges that went along with this service but because our telephone company has a special deal with the cinema we were able to get our tickets cheaper and there was no booking fee attached. I saved a total of $17 which is a great saving. The other great thing about buying on-line you get to jump the cue at the cinema to pick up your tickets.

2. Arrive about 15 minutes before the movie starts.
During this time pick up the tickets at the box office, take your children to the toilet, find your seats in the movie theatre and talk to them about the behaviour you expect of them during the movie. Also when you talk to the children during this time I'd whisper as it allows you to help them realise how loud they might be talking prior to the movie starting. I was able to pick my own seats when purchasing my tickets so I had the opportunity to pick seats up the back and no one would be climbing over us to get into their seats.

3. Take advantage of the booster seats provided.
Our local cinema offers booster seats that have cup holders and food holders built in so that the children don't have to pass thing back and forward all the time. It also helps if you've picked an easy to access seat otherwise you might hit people with the booster seats you're carrying.
4. If possible sit between younger children.
This method works beautifully if you have two children with you. If you have more than two children I would suggest sitting between the younger children as this allows you to monitor their behaviour and to address problems before they get to big. Also have your handbag available in case you need to find something while the movie is playing.

5. Bring your own small snack with you.
Come prepared. If you have children who like to eat while they're watching a movie and you know that the cinema's candy bar is really expensive then bring your own food.  As our cinema is within a shopping centre, the cinema has an expectation that people will bring their own food and drinks into the theatre. However, a number of parents purchase from the candy bar and if each child get a drink and popcorn you can easily spend an additional $30 plus on refreshments. I took a packet of biscuits, a popper each and a small selection of lollies to share between the two girls. I'm happy to reports that I came home with everything I'd bought with me as the cinema was hosting an event.
NOTE: the cinema was celebrating the release of Diana and they were giving away pink lemonade, biscuits and cupcakes for each patron and my girls got a small drink, mini cupcake and biscuit each.

6. When picking a session time work within your children routine.
I would have to say that this is the most important point to remember when picking a movie. I chose a 6.20pm session last night and that's the start of Viveca's tired time. As I needed my husband home to babysit Quinlan I choose a late session thinking that as she'd had a big sleep during the day I'd get away with it. However, I was wrong and about 40 minutes into it she wanted to lie down and have a sleep. So if you work within their routine you should have a successful visit to the cinemas.

If you follow these six steps you should have a successful movie experience. However, I think that one of the most important things to remember is to select a movie that you know your children want to watch.  Also 'if you're unsure whether or not a visit to the cinema will work with our children' then you can always have a movie experience at home. I hope that these six steps can help you when you get to go to the cinema with your children. If you have any other tips I'd love to hear what has worked for you.

Megan

Tuesday, 24 September 2013

Eye Ball Cupcakes

For the last few weeks some shops have had a small selection of Halloween decorations for sale and it was while I was out with one of the children that I thought I'd attempt to do something to symbolise Halloween. Ever since I can remember Halloween has never been a big thing in Australia, in my thirty plus years we've only ever had trick or treaters knock at our door three times and we've never had anything on hand to give away.
Technically this is our first Halloween in the new house so I thought I'd make a fairly simple cupcake that I'd be able to put together quickly so that if we had people knock on the door I'd be able to give them something without having to pretend we aren't home. The best thing about this recipe is that you don't have to spend a heap of money and there isn't many special items you need to buy - so its a win win for everyone.
 
When I'm backing I generally like to make my own cakes, I usually buy gluten free mixes as it allows me to make something quick, late at night when I've realised I need something the following day. For this particular recipe I used six ingredients and I had everything was done within four hours but this was because I made mine at nigh time and I didn't have any of the children needing my attention.
 
Quick Halloween Cupcakes
Ingredients:
your favourite chocolate cake mix
eggs, butter and milk according to packet
cupcake wrappers
icing sugar
food colouring
¼ cup of coconut
Nestle Areo bubbles, Maltesers or any other round chocolate ball shaped lolly

Method:
1. Follow the instructions on the back of the box.
2. Spoon the cake mixture into the cupcake wrappers and bake in the oven at the temperature on the box. Reduce the cooking to 20-25 minutes, check to make sure they are cooked in the centre.
3. Place on a wire rack and allow to cool.
4. Mix icing sugar, butter and water together to make a soft but usable icing.
5. Add a drop of green food colouring to the coconut and mix until the coconut has changed colour.
6. Once the cupcakes are cool, place a small amount of white icing on top of the cupcake. Take the Areo bubble and place it in the centre of the cupcake.
7. Take a small amount of white icing and place it on the Areo bubble and decorate using black icing to resemble an iris. If you want to make them look even scarier use red icing on the eye ball.
8. Trick or treat they are now ready to eat.
The best part of making these Eye Ball Cupcakes is that if you don't use all the chocolates then you can sit and eat them while the trick and treaters come knocking on the door. The kids got to eat some of these today and they really loved them so it looks like I'll be making these again. So do you have a special Halloween food you make or do you purchase lollies and give them out when kids coming knocking?
 
Megan