The adventure of trying to make a house a home that we built for our family of six plus some craft, home décor, recipes & any family fun we might have.
Showing posts with label DIY project. Show all posts

Monday, 1 June 2015

Soccer Playing Peg Dolls

One thing I was never enjoyed at school was poetry and unfortunately it seems to have rubbed off on Mr C. Earlier this term he had to write a Limerick about himself and something he loved. SOCCER was his topic choice but he struggled to come up with a Limerick within the week he'd being given. Mr Opoes and I read over what he had, it was then that Mr Opoes suggested we all sit down and have a brain storming session and this seemed to help Master C write a better limerick. 

                                  I'm a local lad who's called ocker,
                                  I love to play me some soccer.
                                  I wear the green and gold,
                                  But my team always fold,
                                  'cause I'm shocking as a blocker.

Life went on and I completely forgot about his little Limerick until two Monday's ago when he came home wanting an adult sized shoe box for Technology to make a 'Diorama'. Now A diorama is a way to build an exciting scene in a small space and this is why we needed a shoe box. We ended up getting a box and two wooden pegs from Grandma to create his diorama.

After doing a bit of research Mr C knew what teams he wanted his players to represent, the colours of their uniforms and the general layout he wanted to create. I helped him get the things he'd need from my craft store stash and he set about creating his diorama. I helped him create the background of his diorama and I made sure everything got glued into the box so that it wouldn't fall out BUT he made the Soccer Peg Doll players himself.

To think that with a little thought, paint, glue, cardboard and a black pen you can transform a peg into your favourite soccer player. I hope that he hasn't offended Lionel Messi with his Peg Doll figurine. What do you think? I'm thinking that it's a pretty good resemblance. 

Lionel Messi

I'm so proud of Mr C and I never knew how crafty he was. I've always known that he's loved doing Art at school but with nothing coming home from school it's difficult to gauge his ability. I helped guide him with the hair on both his players and I wrote the number and name on the back of the shirt as Mr C's writing is a little big. I'm so glad I got to watch him today and I'm so proud of the effort and attention to detail he's put into each doll.

Lionel Messi, Australian Soccer

I'm hoping that when Christmas comes around I'll have made a few of these peg dolls with outfits so that I can give them to the girls as presents. I like my chances of gluing fabric onto a peg instead of painting the peg to create my dolls. The other lesson learnt would be to put the facial details a little lower especially when having to paint or glue hair onto the peg.

Have you ever painted a peg person before or do you know of someone who has. If you have I'd love to see some examples of what you've made. Here's hoping Mr C's teacher loves his peg people as much as I do. 

Megan

Thursday, 12 February 2015

Last minutes Valentine's Gifts

I've never made a Valentine's Day gift before because it's just something that we don't do. So the other night while I was grocery shopping I found a bag of chocolate heart's and I thought that I could give them to the kids to give to their friends on Friday. Later that night I said something to Mr Opoes about how Valentine's Day was only seven days away, he looked confused and then he said 'oh I didn't even know it was happening again'. After that little statement I've made it my mission to make something cute for the kids to hand out to their friends on Friday.

Valentine's Day
As I have a 10 year old son I need his 'hearts' to be suitable for both sexes without being too lovely dovey as he'd die of utter embarrassment, the girls on the other hand would be happy with anything PINK. So with this in mind I set about organising some tags that I could print off to go with the chocolate heart. As I had NO idea what I was doing I used Abby's tutorial 'How to Make Pretty Labels in Microsoft Word' to help me place the pretty pictures I'd created in PicMonkey onto a piece of A4 paper. As our printer has run out of ink I took my creation down to Officeworks to get them printed off. In my hast I'd set my margins incorrectly so with a little help from the staff member I was able to print off my tags.
Valentine's Day
I then cut the tags down to size, placed them on some cardstock and cut them out with a little boarder around the paper tag.
Valentine's Day 
Valentine's Day
Lastly, I attached the chocolate in place using glue dots so that the chocolate stays in place. If you can't get your hands on glue dots, double sided tape, sticky tape or washi tape could also be used. Your child could also personalise it by putting the name of the person receiving the chocolate tag and their name on the tag. The other option is to leave it blank and surprise their friends with a lovely chocolate gift first thing in the morning.
Valentine's Day

And there you have it a quick and easy last minute Valentine's Day Gift.

Valentine's Day
So are you making something for your loved one or are you just treating Valentine's Day like any other Saturday? We've got so many activities on this Saturday that we're just going to enjoy spending time with the kids and giving them extra hugs and kisses. So I hope you have a great Valentine's Day and that you get to give something special to those you LOVE.

Megan

Friday, 29 August 2014

Yoga Party Decorations

Earlier this week I showed you the quick and inexpensive birthday invitations that I made earlier this month for my daughter's Yoga Party/ You can find the instructions here.  So today I'm going to show you the other things that I made for the party. For months I'd listened to Mackenna talk about what she wanted for her party and all she really wanted was the girls to come and fun with her while they did some yoga, played in the playground and eat some party food. So I tried to make the decorations, cake and favours reflect the playful, happy and chilled theme that she wanted.

I decided a minimalistic approach would work well for her party as it would allow her to spend time playing, laughing and eating which meant that I could also interact with the other parents. We had planned on doing a few different pink and purple decorations, however the park we used can get really busy so the few things I'd purchased from the discount store didn't get used due to it been really windy. 

When we arrived the first thing I did was cover two tables with coloured plastic table clothes because the tables never get cleaned. I also didn't want to have any of the kids get sick because they'd touched the dirty tables. Luckily I'd bought a roll of stick tape with me so when the wind started blowing the table clothes off, I was able to wrap the table like a present and this ensured that everything stayed in place. 

Yoga Party

As you can see from the picture above I kept the food quite healthy to work in with the yoga theme. The first thing that I made for the girls to tie in with the birthday invitations were water bottle labels. I made the labels in PicMonkey and then I printed them off at the local copy shop. After cutting them to size (I used the same measurements as the water bottle labels) I used a felt pen to colour-in the yoga ladies outfit, I then used clear contact to cover each label before attaching it to the bottle.

Yoga Party

Yoga Party

Mackenna had requested cupcakes for her birthday so I made her red velvet ones with chocolate icing just for something different. I made the Too easy chocolate cake from my thermomix Everyday Cookbook with a few changes to suit our party. Mackenna had picked out some cute purple polka dot cupcake cases so I made some cute cupcake toppers that would tie the theme together with the yoga. I used the same elements I'd used for the party invitations and the drink bottle labels. Each child was given the coloured cupcake topper that matched their invitation and water bottle.

Yoga Party

The last thing that I made were the gift bags that we gave to each girl when they were leaving. Usually these bags are filled with sugary treats and toys that don't last very long. I thought that because Mackenna had a Princess theme for her Yoga class, I decided to include lots of princess things as well as a few stationery items.

Yoga Party

Yoga Party

I'm glad that I put all my effort into making these few things for Mackenna's birthday party. At the end of the party every little girl came up to me and thanked me for their water bottles and gift bags. I'm so glad that I went with the colour theme mixed in with the princesses because I think that was something the girls weren't expecting. Overall, it was a great party and I got to talk to a few mums and put a mum to a child's name. I also kept costs down with all the decorations and food. This meant we could take Mackenna out for a special dinner on her birthday which is something we've never done before.

Megan

Sunday, 10 August 2014

Colourful Tulle Tutu

We have a heap of events coming up in the next few weeks at Kindergarten and school which require me to create outfits for the kids to wear. The first event we have is the Kindy Disco. Some of the lessons they've been doing is learning about patterns so the teachers have asked the kids to wear a patterned outfit. After looking through her wardrobe I soon discovered that she would be wearing solid colours so I decided to make her a skirt.

After talking with Viveca I soon realised that she didn't want an A-line skirt she wanted a tulle skirt so that she could look like a ballerina when she went to the disco. So I took her to Spotlight as I had a 30% off discount voucher which I was able to use store wide. Viveca decided that she wanted her skirt to have her four favourite colours in it so she picked out a glittery yellow, hot pink, red and a glittery purple. These four colours formed the pattern of her skirt. We also decided on a hot pink ribbon to use so that she could have a pretty bow on the front of her skirt. Originally, I was going to sew together a piece of elastic to make the waistband but after searching Youtube I decided to use the ribbon that I'd bought as the waistband instead.


After watching the video by NashvilleWraps I knew that I had the wrong sized ribbon but I thought I'd give it a try before rushing off to the shops again for more ribbon. I'd purchased one metre of soft tulle (1.09 yards) in each colour so in total I had 4 metres (4.37 yards). Using a rotary cutter I cut my pieces three inches wide as six inches didn't provide enough pieces of tulle to attach to the ribbon. I also used every part of the tulle so if I had two inches left over I used those to fill in spaces that needed it. I'm really happy with it and for $27.00 it might not be cheap but it's original.

Tulle Skirt

Overall I'm really happy with our Tulle Tutu and Viveca loves it. She's going to wear black leggings so that the tulle doesn't itch her in any way shape or form as I'd hate to be halfway through the night and she's wanting to remove the skirt. She's already put her outfit together and she's counting down the the day's until the Kindy Disco. (Sorry about the picture but after been out all day the light wasn't working for me.)

Tulle Skirt

I'm thinking that I might make a couple more for Christmas Day as I can picture both my girls wearing pretty glittery red and green tulle tutu's on Christmas morning. So tell me what you think does she look like she's ready to rock and roll on Friday night?

Megan

Thursday, 6 March 2014

Thrifty Finds

As you know it was my birthday on Tuesday, so this year I decided I'd go and do something I wanted to do for a change instead of rushing home after school drop off. First off I went to Muffin Break which is my all time favourite coffee shop and I collected my free coffee (which I up sized) and my birthday muffin. Like all good mums I gave the muffin to the kids to share because hey I'm doing weight watchers and who needs to use all those points before lunch! We then headed off to a thrift shop I'd seen years ago but never visited.

In Australia we've had a few issues with our thrift (aka Op shops) stores so I was hoping that this store was large, not over priced and they had things I wanted to buy. In the past I've always gone with Mr Opoes because he helps control the children and this means the kids are better behaved. So today I set out a few ground rules with my four and two year old just so we got a good look around without them touching or breaking things. In the past I've always found Lifeline to be a little over priced and today was the same. Some of the items were the same price as the brand new equivalent and pieces in the furniture section were a bit on the pricey side considering they're second hand.

Now when I started I didn't really have a list of all the things I wanted, all I knew was that I wanted a novel so that I could turn the pages into flowers for a craft project I'd been thinking about and maybe a ramekin dish that was bigger than the ones I already own. As you can see I didn't want much as my expectations were low especially when I knew it was a Lifeline store so I was only expecting to spend ten dollars.After walking around for about forty minutes I was ready to pay for my items and that's when I found a coffee table with the most beautiful lines and I knew straight away it was coming home with me. I didn't even care about the price, it was love at first sight. Sorry Mr Opoes I've another man in my life and he's got curves, DIY potential and he was cheap ha ha.

I've only had the items for a couple of days but I've got plans for every item so I thought I'd share a picture of each item, a brief description of what I want to create with each item and how much I paid for them. I paid a total of fifty-two dollars and fifty cents for everything which I'm really happy about.


Each of these items were very cheap and they'll get used within the next month or so. A is a book that I'll be using to create paper flowers with and it cost me two dollars. B is the two ramekin dishes that I had on my list. The taller dish is just perfect for Caelan when I make cheese soufflés, it cost fifty cents and the smaller dish is a heap bigger so that'll come in handy when I'm making a soufflés for Mr Opoes dinner and it cost two dollars. C is a single pillowcase that Viveca fell in love with and I thought that it would be perfect to use to make a skirt with. She loved the flower with the smiley face and it only cost me a dollar and fifty cents.


The picture on the left is a wooden tray box that has six cubes and I'm thinking of either painting the inside of it or putting scrapbooking paper in there so that the children's pet rocks can be put on display. I'm not sure if I'd hang it on the wall or put it on the desk yet but at four dollars I was really happy with it. The item on the right is a pillow and at two dollars and fifty cents I'm really excited to find a cover or make one so that it can go into any of the bedrooms. I'm thinking I might use it in my room.


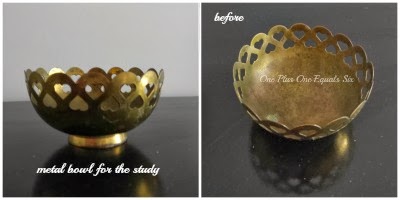
This is a brass bowl that I saw from a distance and when I picked it up I was happy with its weight and the fact that it wasn't dented. At two dollars and fifty cents it was the bargain of the century. I'm going to clean it up a little on the inside and then spray paint it silver, it'll then go into the study to fill in some of the vacant space in the bookcase. I'm looking forward to completing this small project.


I'm going to paint the coffee table so that it can go into our lounge room. I'm in the process of picking things for the lounge room so I'm going to have to wait a while before I decide what colour to paint it. My first thought was white but I'm thinking of picking one of the colours from my entry. It might work better as the gallery wall can be seen from the lounge room. I may have to live with the table as it is for a while as I don't want to get it wrong and then have to redo it. I paid thirty dollars for it and it was the cheapest coffee table they had in the store. I'm really happy I saw this on my way to the checkout, so much so that I did a happy dance when I paid for it.

The last thing I found is for Caelan and as soon as I saw it I knew he'd love it. It wasn't until I got it home that I realised that Star Wars storm troopers had been mixed up with Batman and Robin. When I gave it to Caelan that was the first thing he saw but after a bit of thought he decided that he loves it. One thing he's asked me to do is to change the colour of the background but I'm going to use it when we get around to decorating his bedroom especially when he wants a space, Star Wars inspired bedroom. The artwork cost me seven dollars and fifty cents and I'm now kicking myself that I didn't buy the other Star Wars inspired piece. I'm thinking of framing it as the edges are a little rough.


I'm thinking that I might need to frequent thrift shops more often because I was really happy with what I found today and if I play my cards right I'll be able to find things at a good price and then I'll finally be able to decorate this house sooner than later. So what do you think of my treasures? I'd love to hear about things you've found or even see pictures so if you've got something on your blog or Facebook page leave me a link and I'll check it out. If you just want to share the picture with me contact me via my Facebook page (One Plus One Equals Six) as I'd love to see what you've found.

Megan

Friday, 28 February 2014

Our Willy Wonker and his Chocolate Factory

As the shortest month of the year you'd think that time wouldn't whiz by at double the speed it usually does. I'd like to know where February has gone? It seems like only yesterday that we were finishing up with January and now we're about to wave goodbye to February. This month we've celebrated four birthdays, had a big party for my mother's sixtieth, driven long distances for events, started dance lessons for a four week trail period while still going about our day to day lives.

The temperatures here in my part of Australia have been hot, humid and really uncomfortable especially when you don't own an air-conditioner, but we've managed to work through them. I've worked on a few little things this month that were food related which I planned to share with you but unfortunately with the heat I've forgotten to take pictures or save leftovers so all my great blog ideas have literally been eaten up. However, I've managed to try a few new recipes which have been well received by four of the five food critics I have living with me. As always I'm yet to receive a perfect score with my dishes but I'm still trying because one day soon my two year old will love what I've made at the same time as the other children. It'll happen and when it does I'll have the camera ready.

School is in full swing at the moment, the eldest two are adjusting to the change in routine and they've also embraced the changes made to the homework program. We're loving the fact that we can do a small amount of homework over the weekend which frees up time during the week to play in the afternoon. Mackenna is enjoying having her violin and she practises every night plucking the strings, however ask me in a months time what I think especially when she starts using the bow. Caelan's teacher is lovely and I think she'll encourage him to focus more this year which should help him in the coming years.


One of the activities he could do from his homework sheet this past fortnight was to create a chocolate bar anyway he wanted. As this activity requires some adult supervision I had the pleasure of helping him create a chocolate that he'd share with his class. Initially many of the ideas he had were already available and with the majority of his classmates also doing this project he was running out of ideas. While walking through the lolly isle at the supermarket he choose two different chocolate bars that he was going to mix together with the melted chocolate in the hopes of creating something edible.

After a bit of brainstorming and guidance I helped him create a cute little chocolate that he took to school to test out on his class mates. Later in the term he'll work on branding, a logo and an entire marketing campaign for the chocolate bar he's created. At the moment he's named it 'Crunchy Heart Bar' but once he's been given more direction and an overview of the assignment I'm sure his little chocolate bar will get a new name, packaging and a cute little logo.


So what do you think of his little chocolates? I love how he's used white and milk chocolate while also incorporating little candies I had in the pantry, when you bit into them its nice to see tiny little pieces of colour. I'm very proud of his efforts, who knows maybe I'll talk him into making chocolates for Easter instead of going with the traditional Easter Egg thing. I'd love to here if you've ever made chocolates before.

Megan

Wednesday, 26 February 2014

5 Minute Ribbon Necklace

We're five weeks into the new school year and my little Prep girl has just received her first birthday party invitation. To say she is excited is an understatement and she's been talking non-stop about what she'll do when she arrives, the games, the music and the PRESENT. Every time we get a party invitation I get a little stressed because I'm never really sure whether I should buy or make a gift for the birthday boy or girl. This year I'm a little luckier because my eldest is going to be nine and nine years old boys don't want handmade gifts so I'll just have to brave the toys aisles to see what we can find.

So been the first party of the year I decided that I'd contact the birthday girl's mum, ask her what she'd like me to get for her daughter and then go from there. I found out she loves Barbie, dressing up and jewellery. Now I took my daughter to the shops to LOOK for ideas and if she'd had her way we would have been walking away with hundreds of dollars worth of Barbie dolls and accessories.

After sitting down with a drink together we came up with a plan to create a few special, one of a kind necklaces that worked in with the Barbie theme while also adding a few other accessories so that they could be used during dress up time. This meant our gifts would tick off all three of the birthday girl's favourite things list and we'd be guaranteed to get a smile. First up I went looking for a few small pieces of jewellery that would be ideal for dressing up and I also found a small quilted case to hold them in. While in Kmart my daughter found a Barbie make up kit and we also found some really pretty silver bangles that would go perfectly with dressing up.


The only thing left was to make a couple of ribbon necklaces and the gift would be ready to wrap. While visiting my local scrapbooking shop one week earlier I'd found a few antique gold jewellery bits and I knew that they'd be perfect for the job. The great thing about this project was that I already had most of the items on hand and each necklace cost me under two dollars. I also personalised one of the necklaces because I wanted it to be special for the birthday girl. I drew the Barbie logo with a black pen on a piece of pink paper and I added the year that she was born as there wasn't much room to write her birth date.


Overall I'm really happy with the entire gift. Mackenna and I really like the necklaces the most and that they're handmade, makes them extra special. I have chosen colours that relate back to Barbie and that will work easily when the birthday girl is playing dress ups. Although the gift might be small in size there's been a lot of thought, effort and care put into the entire gift. 


These necklaces are easy to make and the fact that you can personalise them makes it even better. I think I'll buy a few more pieces for future birthday parties so that Mackenna or Viveca can give them as personalised presents. If I knew making a necklace like this was so easy I would have made some of them ages ago. My birthday's next week and as a treat I'm going to make myself a few of these necklaces so that I can add something personal next time I go out somewhere special. Kidding! I'll just make one pretty one and wear it when I go to school and grocery shopping.

With the success of this project I'm now thinking I'd like to try making some more jewellery but I want to try making something more decorative and something with a chain. In the last few days I've taken more of an interest in the jewellery section when I'm out at the shops. Might have to take my time with the next project as my craft area is getting crowded with all the stuff I've already got. Glad Mr Opoes leaves me to my own devices when it comes to crafting but I think I might need to narrow it down to two crafts and focus my attention on them.

Megan

Wednesday, 12 February 2014

Test Tube Birthday Treats

Last weekend we celebrated Viveca's 4th birthday and although we weren't having a birthday party I wanted her to give little thank you gifts to her sibling and that's when Test Tube Treats were created. I'd been walking the aisles of my local dollar store when I came across these test tubes in the birthday section, so I grabbed a few boxes and off I skipped home. Like every birthday we have at home I make a specific birthday cake, we have birthday presents and generally do what were the birthday person wants to do. So as you can see it's a very low key affair.

This year Viveca wanted a Peppa Pig birthday cake and as I was purchasing it from my local Woolworth's store I felt the need to do something a little extra for her on the day. Now the hardest part of this project was designing a little gift tag as I'd never done it before and printing out the gift tag. All this was difficult because I had know idea what I was doing and our printer ran out of coloured ink, so off to our local print shop I went to get three tags printed. Now for all of you out there who know how to use a computer I'm sure you'd have this done and dusted in less than five minutes. Next time I do something like this I might reduce the size of the tag because when I printed it out it was a little large.

The next thing I did was to divided my Jelly Beans into different colours just to give a more scientific look to each test tube and then I filled each tube with the jelly beans before screwing the lid on. I then attached a small piece of twine to the gift tag and I wrapped it around the top of the tube, tiring it off to secure it to the top of the test tube.
There you have it. If you're talented you can have these made within fifteen minutes but if you're not so great it could take you that long just to design something simple. Viveca thought they were a great idea and as her Barbie bike wasn't ready to be delivered I was able to still make her feel special. I love the size of these test tubes because you don't have to fill them to the top and they would be great for a science themed party.

So what do you think? I'm really pleased because each test tube treat come in at under $2 but it would have been a bit more expensive if I hadn't used lollies we already had on hand. Viveca thought it was a great. To save on any future dental bills I shared the two tubes between the four children and they were happy with that. If I was going to use these at a birthday party I think I'd fill the tubes with a mixture of small and large jelly beans, overall I was happy with this project.

Megan

Friday, 7 February 2014

Man Cave

Like most men my husband would love a space he could call his own and that's why I decided to turn our study into a man cave. For Christmas we put a shed up in the backyard, in order to free up some space in the garage. Now my husband isn't a shed type of guy so we needed an area in which he could hide away and do what ever men do in their caves. So with only one room left, the study will become his office when he works from home and thus it'll also be known as his man cave.

Like many couples if you present a space to them and asked them how they'd decorate it their responses would probably be quiet different. That's what it's like in our house. Mr Opoes likes a modern, minimalistic look with clean lines and I like wooden things, vintage items while also liking some modern pieces. I know you're thinking that we really don't have much to work with because we like different things but when we moved into our house we decided that we would like to decorate the house in a classic, vintage style with items that aren't cheaply made so that they will last us longer or so they'll last the children's treatment of them.

When we were building our house we designed the study to have two functions, one was to be a study and the other was to act as a guest room. After living here for nearly two years we've never had a guest sleep in the study. So when I was planning how I wanted the room to function I've made room for a blow up mattress to fit, still allowing the room to serve two purposes. This foresight meant we were able to add a built in wardrobe, thus allowing us to divide up the space between my husband's study and a guest room.

Last year I purchased a beautiful barn style door that I wanted to use as a table top for a desk and after explaining my concept to my husband he seemed pleased with the idea. Using the door will allow me to create a unique feature within the study as the door is  fifty years old so it'll be a vintage item with somewhat of a classic style. I'm looking forward to seeing what the door has to offer once it's stripped back and I'm hoping that we'll have a unique desk top for the room. The additional benefit is Mr Opoes will have a place to rest his laptop on while he works instead of sitting in the middle of the house, in the kids area.

Gallery Wall

Other decorating ideas include creating a gallery wall that you see when you come through the door. Directly opposite I'm creating a storage space so my husband doesn't have to leave the room to find a file while he's working. After talking to some of my blog friends on Facebook I also decided to hang three pictures above the storage space as they're sentiment to my husband and I, but I'll share those with you when the room is all finished. When I did the gallery wall in our front entrance my husband helped me hung all 33 picture frames and it was during this time that I learnt he liked the concept behind a gallery wall.

With this in mind I wanted to create something slightly different so that it would have more of a masculine feel about it. When I talked to my friend Mel over at Mellywood's Mansion she gave me the idea of creating a monochromatic gallery wall as she thought this would be something my husband would enjoy. This idea was perfect as I'd wanted to cover a corkboard within fabric, plus I had a few embroidery hoops that would be ideal for showcasing pieces of fabric to create the monochromatic look I was after. Not long after this Christian (another blogging friend) posted a picture on Facebook showing what Jamie from Raising up Rubies did with an embroidery hoop and I was hocked.


Now if I'd shown this picture to my husband he would have laughed but I had just the right shirt to go in my embroidery hoop and it would work perfectly with the monochromatic theme. The shirt I had in mind defines my husband so it was a no brainier that it would be perfect for my gallery wall. The other good thing was I could use the wooden hoops frames and this would save me having to paint them. After spending time ironing the shirt, sewing it down in places and hiding all the extra material in the back I was left with this.

Gallery Wall

I was really happy with the way it turned out and because of the size of the hoop I found it was easier to use cotton to hide the extra fabric instead of using glue to hide it away. I was really happy with they look that the various hoops created especially when I paired it with a few square canvas's, the rectangular corkboard and photo frame. When I presented the finished wall to Mr Opoes on his birthday he really liked it and ultimately that's all I was trying to achieve.

Gallery Wall

I am really happy with the look of this wall and I think that even though its monochromatic and masculine I really like it and I can't wait to get the entire room finished so that I can continue blogging in there when Mr Opoes isn't working from home. I'm hoping to find a way to use the kid's pet rocks in the room so maybe I'll find a space for them in the future. So what do you think I'd love to hear your thoughts on my little wall. Should I use the rocks on the wall? Tell me what you would do.

Megan

Monday, 3 February 2014

Rock Art falls for love.

Over the summer holidays I've been slowly working on doing up the study so that Mr Opoes has a quiet space to work in while he's working from home. Part of brief I set myself was to create a masculine, functional and usable space that we'd both comfortable using day or night. I also wanted to add some sentimental items into the room without over doing it. One idea I had was to create a functional gallery wall so that I could incorporate something personal on the wall without it been too obvious. I also wanted to have the option of changing out some art work so that I could change the feel in the the room whenever I felt like it.

As the room reveal will be somewhat of a surprise I tried to source all the items quickly and quietly so Mr Opoes didn't get any ideas about what I was doing. Before I'd even started collecting things to place on the wall I knew I wanted to use the kids pet rocks that they created last year, I liked that when you walked into the room you would't expect to see them hanging on the wall and they would also add a little bit of colour to the monochromatic gallery wall I'm doing.


So I got to work putting it together. I purchased a black shadow box from Ikea, I used some scrapbooking cardstock I already had, grabbed some craft glue and I purchased some stick on magnets. After positioning the kid's rocks in order from eldest to youngest I made the discovery that the piece of glass needed to be removed from the frame as Mackenna's rock was too high to sit behind the glass. Now this was the first problem I encounted BUT I continued on as I knew this was going to look great.


I just loved how they looked and admittedly I wasn't looking forward to dusting them all the time so I thought a quick spray of hair spray could help me out in the long run. I proceeded to stick and glue the magnet's into place on the back of the rock's so that they would eventually stick to the cardstock.


The next step involved placing the magnets to the back of the cardstock and to do this I had marked off where I'd need to place the magnets prior to sticking the rock to the front of the cardstock. This was where my second mistake took place as I only used one magnet on the back of the cardstock for each rock. I should have used a piece of tin, spray painted it white and then attached the magnets as this would have allowed them to stay magnetised.


Now I've got a picture. The first time I had an issue with the finished piece but I stopped taking photo's after that because my rocks just would stay attached to the cardstock or the magnets. In the end I attempted to complete the art piece a dozen times before I called it a day. The picture below looks innocent enough but I ended up having the rocks fall off the cardstock onto the floor time and time again. I only stopped when the cardstock ripped and I'd have to cut another piece.


So in the end I cleaned up all the mess I'd made with the magnets and glitter. I cut another piece of cardstock and I glued an MDF word onto the cardstock. This piece of art took me five minutes, didn't require a heap of planning or things and I must say it looks good. The only negative is that my children's pet rocks will have to go somewhere else. I've got a heap of area to decorate in this house so I'm sure that next time I'll purchase a piece of tin from the hardware store and I'll have them hanging on a wall sometime soon.


What do you think? Did I do the right thing or should I have used the rocks. I'll show you the finished wall later this week as I have to get a picture developed and will hang a few more things before the wall is finished but so far it's looking masculine and I'm loving it.

Megan

Thursday, 14 November 2013

Ombre Christmas Ornament

Christmas is getting closer and I've been madly pinning things to my Pinterest board in the hope of actually getting some Christmas ornaments made this year. Last week I showed you my Bell Wreath Christmas Ornament which you can find here and that little baby is going off to my daughter's Kindy teacher. Now giving gift to teacher's is great but our tree really needs some ornaments too, especially this year as I've decided to go with a colour theme. I've decided to use purple and silver as I really love those two colours together and it's somewhat regal.
 
My daughter's are super excited as purple is their FIRST favourite colour closely followed by every other colour of the rainbow. So when I found this DIY Ombre Ornament I just knew I had to make it straight away. I quickly glanced at the materials needed and off to the shops I went. That was my first mistake as I hadn't read the instructions properly and I hadn't looked at the pictures correctly either. I purchased a bag of polystyrene balls instead of using the plastic baubles that Heather used. My second mistake was I didn't grab enough paint samples from the hardware store so I had to punch my 1 inch circles out and I have the name of the paint showing.
Source
Now the rule generally is that you'll usually make three mistakes before your 'bad luck' has finished and this is true to form for me. So I had one more mistake to make. In my defence I've been on my own with the children for the last three days as my husband is away on business so I'm extremely tired because the children haven't been sleeping like they usually do. I knew I was tired and impatient as I really wanted to get one of these baubles finished so I could show it off to the girls.
 
Now Heather has great instructions and she also took part in a craft video that'll show you each step and how it should look. I didn't watch the video and I just skimmed the instructions because I thought how hard can it be? It was hard, the first step of sticking down the one inch circle on the bottom of the bauble was by far the easiest.


As you can see I have no structure to my ornament. I think that my bauble was smaller than Heather's and my one inch circle punch is too big. I did achieve the Ombre effect but it's not your prettiest ornament and I now if these were hanging in the shop this Christmas season I would walk right past them as they don't appeal to me.
 
I'm going to keep this ornament and hang it on the Christmas Tree but I'm now on the look out for something else I can do with the other eleven silver baubles as we have too much silver for our tree and not enough purple ornaments. I'd love to hear about any problems you've had and what did you do with the ornament? Tell me I'm not the only DIYer on the planet who's ever had a fail.
 
Megan

Wednesday, 23 October 2013

Pantry Storage Containers

As many of you know I'm in desperate need of some sort of pantry storage containers that are going to help create the illusion that my Tupperware, plastics and lunchboxes are all organised. To be completely honest I need help organising the entire house, with a good dose of de-cluttering thrown in. So sometime this weekend I've decided that I'm going to tackle both pantries and if time permits I'm going to work on the rest of the kitchen. Two weeks ago I shared with you the woven baskets I'd purchased and sprayed pink. I decided that these baskets would make the perfect pantry storage containers.
 
 
After working on a to-do list I quickly realised that it would be a good idea to get some of the more decorative items finished before I tackled the pantry. I can't be the only person who does this? When I start cleaning and organising I come up with these great crafty ideas and then off I go to work on them. Days later, the area isn't clean, the crafty idea hasn't been started and I've got more mess than I started with. Not this time, I've made changes and fingers crossed it's going to work this time.

As these containers are going to be place up high in my pantry, at a glance I'm going to need to know what's inside. So I got to thinking about how I was going to label my baskets and that's when I remembered the tin of blackboard paint I purchased six months ago. I remembered a friend had earlier purchased some chalkboards and after contacting her I knew what I needed and where to get them from. So I made a quick trip to Bunnings to purchase some small MDF shapes from their craft section (thanks Mel from Mellywood's Mansion for that tip) which I then painted with the blackboard paint. I painted both sides just in case the MDF shape got damaged while I was using it. I was really happy with my first attempt using blackboard paint.
 
 
The last thing I did was to attach the MDF boards to the basket. Originally I was going to get a piece of string and tie each MDF board off from the top of the basket.  I then remembered I had some black bakers twine, so I searched around for that to use. However, the string would either move or come undone which wouldn't be too functional in the long run. So after a discussion with my very knowledgeable eight year old son we came up with the idea of tying them off on the inside. To achieve the finished look I had to use a darners needle and I worked with the wiring system within the basket.
 
 
I'm really happy with my little DIY Pantry Storage Containers so much so that I'm thinking of making a few more for the other pantry so that I can store light globes and any chemicals that I don't want the children to touch. Who knows I might just spray them bright orange. So do you think my baskets will add a pop of colour to the pantry? I know that they will hold a lot of my Tupperware and plastics but I may need to make up more especially with three children needing lunch boxes next year.
 
Megan

Friday, 11 October 2013

DIY Heaven

I've been thinking about creating a chalkboard menu planner for a few months now and after visiting Pinterest I knew it was something I wanted to in stall in our kitchen. Originally I fell in love with these two chalkboards and they were the inspiration behind wanting to have a chalkboard in the kitchen.
both projects can be found here and here
Originally my plan was to purchase 7 MDF clipboards, plaint them up with blackboard paint, label them with days of the week and then hang them on the wall beside the pantry. Once hung I'd be able to write down what we'd be eating each week. After searching on-line I discovered that I couldn't get a clipboard under $3 a piece so I went around town trying to find a cheap clipboard. I found some good ones at Officeworks but at $3.48 each it was going to cost me just over $24 and that was before I purchased anything else to finish off the project.


I really liked the clip on these boards but I didn't like them enough to pay what they were asking. So after weeks of looking and finding clipboards that were more expensive I'd started to give up on my dream. Then last weekend we went off to Bunnings to look for a garden fence as we need to place a few on the sides of the house to keep the children in the backyard. About an hour later I walked out of Bunnings with a few vegetable seedlings, some decorative trim, liquid nails and a 1200 by 900 piece of MDF. I'd gotten the idea of creating my own framed blackboard and that's all it took.
 
Later that afternoon I sent Mr Opoes off to his fathers place so that he could cut the trim with 45° angles. The only power tool we currently own is an electric drill so I was happy that my father in-law was able to help us out with this project. I'm now looking forward to getting this project underway this weekend as I'd love to have it hanging on my wall by the end of the month. My to-do list is growing everyday as I'm getting some really interesting ideas BUT they might have to wait a while as I have to save the money first to fund the project.
 
So what are your plans for the weekend? I'm hoping to get a few projects started, do a bit of cooking and to spend time playing with the children. Fingers crossed I get something crossed off my list this weekend :)
 
Megan

Thursday, 3 October 2013

Pantry Organisation

When we decided to build our home I was really excited that I'd be able to make changes throughout the original house plan thus making it OUR design and our family home. One of the areas I spent a lot time on was the kitchen and the adjoining butlers pantry. Our previous house had a five shelf pantry that was about the same height as a refrigerator and I was forever getting frustrated as I never seemed to have enough room to store things other than food. So I really wanted a pantry space in this house that would allow me to store food, containers, special items and things that I don't want my nearly two year old to get to.
 
During one of our many visits to the house during construction my brother's girlfriend asked me what the small room at the other end of the kitchen was. I told her that it was a linen cupboard that I could use to store things that didn't fit in other area's of the house, she suggested that I use it as another pantry as that would allow me to store more food and possibly reduce the number of times I had to shop during the year. The reason for having this space was because I've always believed Australian homes don't have enough storage within the house for families. Nowadays builders seem to be providing us with even less storage options than what they provided twenty-five years ago when my parents were building their home.
 
After listening to her idea, Mr Opoes and I went back to our rental house and spoke about what she had suggested. Having decided to use it as a linen cupboard was OK but technically it was in the wrong position and as we already have a large area in the laundry to store our linen it just made sense. If I'd been honest with her I would have told her that I'd always had a problem with the cupboard been off the kitchen and it wasn't possible to change the position of door due to the nearby rooms. So with a few months left of the build I got to thinking which space would be to store my food and which would be used to store my Tupperware, special items, containers etc.
 
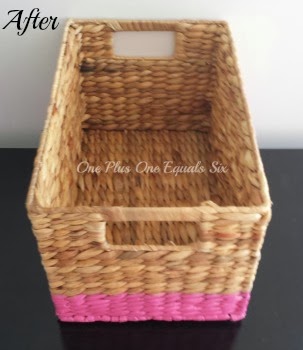
Recently I watch Quinlan playing with all my plastic containers and that's when I got to thinking that I needed to create a storage solution to look after the growing collection of plastics and Tupperware that I've accumulated over the years. So with this in mind I got to thinking about what I could create and where I'd like to position my plastic and Tupperware collection. I purchased a few weaved baskets from my local Kmart store and a can of PlastiKote spray paint from the hardware store.


I wanted a hot pink colour and I fell in love with the colour of the lid so I was really surprised to find out that the colour I'd chosen was called Heather Violet but I must admit it's a really nice colour if done in moderation.
So this is what I came up with. I undercoated a small section of each basket, left it to dry for the required time and then I sprayed it pink. I had to spray it twice with the pink so that I could get into all the uneven spaces that each basket has. I then left it to dry for 48 hours just to make sure it was really, really dry. Lastly I stuck four one inch felt pads on the bottom of the basket so that it wouldn't mark the bottom of my pantry shelves. I haven't completely finished the baskets yet as I'm still waiting for Mr Opoes to drill holes into my chalkboard labels so that I can use the large tin of chalkboard paint I have.
 

I'm going to say that these new storage containers will save my plastics from disappearing, I'll be able to match them up when I use them and they'll be up high enough that my four lovely children won't be reaching up to steal them time and time again. It'll also help heaps next year when I have three children attending various educational locations so that means I should have more room for lunch boxes and drink bottles. So do you have a special storage trick that you use to keep all your plastic container under control. I'd love to hear about it as I'm desperate to get our house de-cluttered and organised before the year's finished.
 
Megan

Monday, 16 September 2013

Gardening Mis-Adventure...

 
Last weekend I had an extremely long to-do list that I wanted to complete, unfortunately we'd already planned to meet up with some friends Mr Opoes hadn't seen for a few years and all my plans went off the rails. I've always known that I'm a very unorganised person, which is somewhat of a problem. OK it's a huge issue in this house. You'd think marrying a man who's organised, has a routine and can tick things off a to-do list quickly would make us a winning combination. RIGHT. NO. We seem to have vastly different ideas of what needs to be done and communicating the next step isn't something either one of us do well.

One of the most important jobs I wanted to tick off my list was constructing two garden beds and plant them out. We started this task on Saturday at about 11am, now you would think a quick visit to the hardware store and home again would see this completed in four to five hours. Wrong. It took us two and a half hours at the hardware store, then we rushed home unpack everything we'd just purchased for ONE garden bed and not TWO like we planned before we rushed off to meet up with Mr Opoes friends. Now the plan was to spend three hours socialising before coming home to finish off anything that needed to be done with the garden.

In reality everything got started on the Sunday afternoon which only left us enough time to build one raised garden bed and to fill it with the supplies we'd spent over two hours buying. I then went off to another Kmart to purchase some pool noodles as I'd only managed to pick one up. I had thought with the warmer temperatures the noodles would readily be available however they are proving difficult to find. So after a total of four hours work over two days we had built, filled one raised garden bed and I'd made it a little more safe for the children.

Next up I need to plant my seedlings and packet seeds, add some supports so that my three tomatoes can climb and make some labels so that I know what I'm growing. At the moment it looks like I'll be busily planting this little veggie patch out on Saturday afternoon after the Family Fun Day that Mackenna's kindergarten are having this weekend. In the meantime I need to get working on all the labels so that Mr Opoes and I can spend a few hours constructing the second garden bed so that we are all ready to go.

So I'm hoping that when the children start their September/October holidays I'll have the garden beds all planted out and that I'll be able to have to children help with the watering and weeding of the veggie patch. Unfortunately, I don't have any photography's due to losing the camera outside. I'd placed it on the water tanks pump while we were filling the garden bed with all the soil and as the water tank is used to flash the toilets the vibration from the pump the camera has fallen off onto the grass. So after searching inside the house top to bottom for four days I went outside and I retraced my movements and guess what I found it laying on the grass. So now I'm waiting for the camera to dry out a bit before I use it again.

I've also been working on a little organisation project for the pantry which I'm hoping to finalised in the next few days so that I can share it with you. I'm trying a new type of spray paint so it's drying time is a bit longer than I'm use to so I'm hoping I've done it right. When I've finished this project I'm hoping that the colour I've chosen will work well with the kitchen finger's crossed.

Megan