The adventure of trying to make a house a home that we built for our family of six plus some craft, home décor, recipes & any family fun we might have.

Monday, 2 April 2012

I have a KITCHEN

Today is the first day of school holidays so I loaded the kids into the car and off we went to the block. I knew that the fit out carpenter was coming today, I wanted to talk to him about the height of the skirting board or baseboards if you live in America. Click here for a detailed definition. Seems like a silly question but I want our tiles to sit under the skirting boards so I needed to take a floor tile with me to show the guys its height and then I have to allow for the glue being used. I arrived at 9am and these guys were no shows, instead I found the plasterers there checking over their work and giving the walls and ceiling a final sanding. They ran out of time on Friday due to being stuck in traffic after an unexpected traffic accident.

What I wasn't expecting today was to find that our kitchen was being installed. My first comment was that I'd hoped that the cabinet maker had received the correct plans considering we'd spent hours going over the plan and then pointing out every mistake Coral had made. We had to get them to draw up the plans 6 times before they got it right, so now I'm going to have to and look it over when its finished to make sure that everythings alright.

So this got me to thinking about how things are going to look. I found a few pictures of what I'd end up with so I thought I'd share them with you.
Small gallery kitchen.
Gallery kitchen with butlers pantry.


Black caesarstone bench top. LOVE.
3 pendant lights.
So these four pictures helped me form the idea behind what I wanted in my kitchen. I wanted to have a black Cesarstone bench with waterfall ends, three pendant lights over the breakfast bar area, to have a gallery style kitchen and to have a large butlers pantry. The majority of the display homes we visited all had butler pantries, they were all galley styled and they were all super shiny. So I was hoping to pull off the shiny look but as that was going to cost big $$$ I had to settle for something slightly different.

I have a few pictures of what arrived today and as I'm going up to the block again tomorrow I'll have a few more pictures of what's been done. I'm hoping that the lights match up, that the colour looks good and that the cupboards etc are all correct.

Some of my drawers.
My Island bench and that little black area in the
top right hand corner is my pantry.
This is looking at the kitchen from outside. The Island bench will be a breakfast bar, hold the kitchen sink and the dishwasher will also be here. The oven, microwave and fridge are on the back wall.
So here's hoping that I get to there tomorrow and my carpenters are there, I don't really want to waste another trip to the block with 4 bored children who'll want to get out and run around. I'm hoping that the kitchen may have been layed out, this will allow me to check that everything is correct. Fingers crossed.

Megan

Saturday, 31 March 2012

LEGO BIRTHDAY CAKE

So it was Caelan's seventh birthday last Saturday and he wanted a Lego cake for his birthday. I agreed to make him a Lego cake because I didn't think it would be that difficult. Last year my sister made a Lego inspired birthday cake for my brother's 24th birthday. At the time she used fondant icing which she tried to colour red and I remember her telling me how hard it was to get the fondant a true red colour. She also priced getting a Lego cake made, she was looking at a minimum of $300 which we both thought was overpriced especially as the concept is so simple.

So after talking it over with R a few times she gave me some helpful advice regarding the cake and how to go about constructing this cake. I was going to make a few butter cakes, cut them into the correct Lego shape and then ice them. R's advice was to buy a half sponge slab from our local Woolworths supermarket because that way you won't have any problems with the cooked cake. So I placed an order for the slab of sponge and then I went about collecting all the supplies that I'd need. It was while I was looking for a round cookie cutter that I found a small unfilled sponge that would be ideal for the tops of each brick. So I searched Pinterest to get some images to help me gather my thoughts on what I'd need to do.

Now because my birthday boy wasn't feeling well on Saturday I opted to do his cake on Sunday, this created a birthday weekend and the fun lasted longer. So we went out, met up with Aunty C, Oomie and his 2 cousins. After spending a few hours hanging out it was back home and then Mummy was off to start the cake decorating. How hard could it be? All I had to do was colour the icing, put it all together, sing Happy Birthday and then eat it - an hour tops. Well 4 hours later we finally sat down to sing Happy Birthday and then it was off to bed for my 3 very tired children. Quinlan had gone to bed 2 hours earlier so he missed out on the special celebrations.

So here is what I did, I won't go into too many details but I'm sure you can see what I did from the pictures I took.

METHOD
1. Decide on the size bricks that you want, Caelan wanted a 4x2, and a 2x2 brick. I had 12 tops so this was ideal for the sponge size I had. Cut out all the shapes you need to construct your Lego brick. I then decided to make on 2x3 brick, a 2x2 brick and a 1x2 brick using three different colours (blue, green and yellow) As you'll see from the pictures that due to the time it took me I dropped the 2x2 yellow brick.
The smaller sponge I found was ideal for the Lego tops and the
cookie cutter was the ideal size for the overall appearance
of the Lego bricks.

2. Mix up your icing (I used butter icing) and ice the entire cake. I iced the bottom section of the cake first, then I placed the tops in the correct position and then I iced around the edge of the circles and then I finished off doing the tops of the circular sections.
You can see that I left the top of the green Lego brick until last.
The finished Lego brick is a little rough but Caelan didn't care.

I had a few issues getting the colour right, I added so much of the blue and green food colouring. Looking back I think I'd start earlier and I spend a bit more time working on the correct colours. The Lego was from their pastel series.
 
 
3. Make sure you have placed your Lego cake pieces a good distance apart and then gather your child's favourite Lego figurines and put them on your cake or on the cake board. I placed mine on the board.
Caelan loved the Police Lego so I grabbed 2
figurines a robber and a policeman.

4. Decide on the number of candles. Although Caelan was 7 I used 1 candle because I didn't want to crowd the cake and secondly because there was only one candle that looked OK.

All in all the cake was a winner, the kids loved it and the good thing is that Mr Opoes and the kids have all been able to eat left over cake all week for morning tea. The other positive is the left overs haven't taken over my freezer I still have room for everything else. I will make this again especially if Quinlan is as Lego obsessed as Caelan is.
 
 
Megan

Friday, 30 March 2012

Scholastic a great fundraiser and a good read.

Both Mackenna and Caelan received their Scholastic book lists the other week and Caelan had a list a mile long of what he wanted. I found Mackenna's in her school bag so she didn't know anything about what was on offer. I've always enjoyed getting the little pamphlets even when I was in primary school. I'd do what Caelan does now only difference being I never asked mum or dad for the books because I knew that I either didn't have enough pocket money and I'd have to ask for the rest or because there was something else I didn't want to miss out on. So I'd save my money and daydream about the books. 
When Caelan was in Prep I got him a Lego book from Scholastic. I'd never seen anything like it in the stores and he's addicted to Lego so I knew I couldn't go wrong. Well this time I placed my order with Marchant Park because it gave me extra time to look over the pamphlets, I could think about what I wanted instead of making a rushed decision and I had time to find the money I'd been putting aside to buy the children's some books. Hands up if you love moving.

So I purchased 6 books. It should be 2 books per child but they will share some. I'm now on my way to growing their library, helping them read better and allowing them the chance to learn to love reading. I was amazed that these 6 books only cost me $20 and even better there was no charge for postage or petrol. What was even better I got the books back while dropping Mackenna at kindy so no one saw them and I then had the opportunity to hide them away. So this is what I got each child, I'll show you the books and then give you a breakdown of the costs involved.

Caelan has received the following 3 books and I'm hoping that everyone will get to use 'Silly Milly and the Mysterious Suitcase'. If Quinlan is lucky he might get to have a look at the 2 Lego books Caelan received but I wouldn't hold my breathe if I was him.
Silly Milly was a little too easy for him, might give it to Mackenna.
So this is how much each of Caelan's books cost. Silly Milly $3, Fight the Fire $3 and Escape the Lego City $4.50. Total cost $10.50
Mackenna got 2 books I'm hoping she really likes them. I read Hattie and the Fox to the kid's after we got home from school. They all liked the story but when I gave it to Mackenna she seemed upset she really wanted Caelan's Book Silly Milly. Here is what Mackenna got.
I might give Mackenna Silly Milly and Viveca Hattie and the Fox. Not
 sure will watch to see how the kid's go with the stories.
Mackenna's 2 books were really cheap and I always love a bargain. Strawberry Shortcake Activity Book $2.50 and Hattie and the Fox $2. Total cost $4.50.

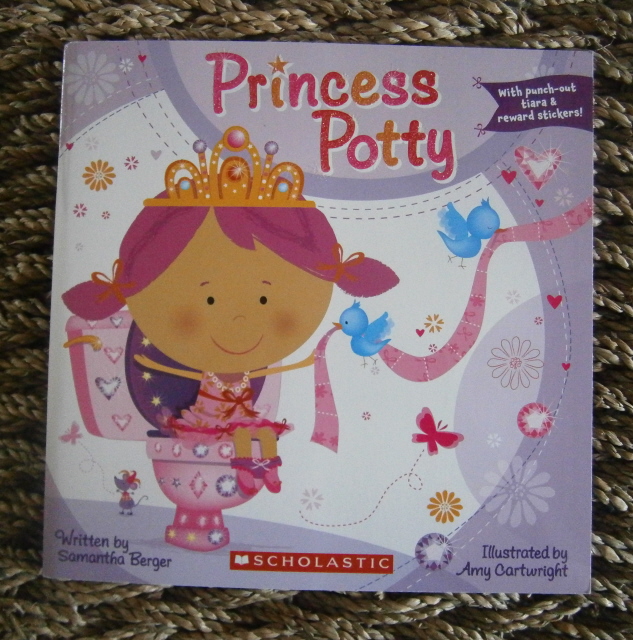
Viveca ended up with only one book but I'm hoping this book will help her toilet training. I saw this title first and I knew straight away that I wanted this book so there was no question about who was going to get this book and teaching aid. Viveca's book cost $5, so that's how I got 6 books for $20.

This book comes with a crown and reward stickers that go on the crown.
This is a good little book. The stickers you'd give your child as a reward go onto the crown and this helps reinforce the behaviour that you want the child to do. Viveca is getting there she knows what it feels like to need to use the toilet but with all the driving we do each morning and afternoon she doesn't get too many opportunities to use the toilet.

So all up each book cost me $3.33 which is a bargain. I don't know of any book I could get for that price. I'm going to paying more attention everytime these pamphlets get handed out at school or kindy.

Megan

Thursday, 29 March 2012

I made Wontons

I've been watching My Kitchen Rules for a few weeks now and I usually don't get inspired by their creations. They use lots of seafood and other meats that could be costly if they don't get eaten and the fact that my children are very fussy eaters. I get jealous that most contestants have memories of meals their family has always eaten. This year there were a couple of Asian inspired recipes that I found interesting BUT due to the children I'd never make.

So when all the contestants had to create a dish with the mince as their core ingredient I watched to see if I could learn to do something different that the kids would eat. The army boys made small individual lasagna using mince and wonton wrappers. I thought that it was great but because of the size of my kitchen at the moment I'd need to be very organised to create all the elements that the boys did.

With this in mind I decided I'd try to make a mince mix and make wontons using a bolognaise inspired wonton. I wanted to boil my wontons instead of frying them so that the kids would have a healthy meal while getting a few vegetables hidden in the mince mix.

After watching a few You tube video's on how to shape the Wonton's  I quickly realised that using a wet bolognaise mixture won't work so I created a ricotta based mixture. I pre-cooked my mince but I think if I was to make these again I'd use the mince raw and steam them next time. So this is what I did.

Megan's Wontons
500g mince
cooking spray
half a red capsicum, finely diced
20 mushrooms, either finely sliced or diced
1 head of broccoli, trimmed
4 spring onions, thinly sliced
2 eggs, beaten
250g ricotta cheese
40 Wonton wrappers

Method:
1. Cut up all your vegetables. Spray a medium hot frying pan and cook them off until they're soft.
2. Add the mince to the frying pan and break the mince up as it cooks.

3. Remove from the frying pan and place in a bowl to cool. Once everything has cold add the ricotta cheese and the beaten eggs. Mix well so that everything comes together.
4. Place a wonton wrapper on a clean work surface. Place 1 heaped teaspoonful of filling in the centre of the wrapper. Brush the edges of the wrapper lightly with a little water.


5. Fold the wrapper in half diagonally to enclose filling and form a triangle. Press the air bubbles out so that the mixture is enclosed.


6. Pull the top and bottom corners up to meet each other, so that 1 corner overlaps the other slightly. This motion forms a pouch. Press the ends together to seal.


Close up of one of my lovely wontons.
7. Refrigerate with putting a pot of water on the element to boil.
8. Once the water has come to the boil place 8 to 10 wontons in the pot and cook for 4 - 5 minutes. You will know they are ready when they raise to the top of the pot.
9. Remove from the pot with a slotted spoon to drain the water and place into a bowl.
10. Dress with your favourite Asian sauce e.g. soy sauce


Hope you have fun making these. I made all forty of these in about 45 minutes (that's with children coming in and out of the kitchen) and we were eating them within an hour of starting. You could organise yourself during the day so that when it was close to dinner time all you had to do was cook and eat.

Megan

Wednesday, 28 March 2012

One step closer to completion

Today is Wednesday and it hasn't rained in the last three days so I was really excited to call into the block to see what's been done since I visited lasted Monday. It was good to see that all the brick work has been completed so now the focus has moved to the inside of the house. I'm so happy that we're at this stage, now if it rains the roof is protecting the guys and work should progress instead of being delayed with each downpour that hits the greater Brisbane area.
Finished brick work at the front of the house.
Mark has just rung me to give me an update of whats going on. Its great that he gives me his thoughts on the house's progress because I get an insight into how he thinks things are going. He just told me that the roof over the media room was leaking so he had the tile replaced and re-glued yesterday. He then mentioned that the plasterers are on site and they should be finished by the end of the week. From what I saw this morning I'd say they'll most likely finish before Friday.
Mackenna, Viveca and Quinlan came with me this morning, they seemed excited to see the plaster going up on the walls but even more excited to see the shape their bedrooms were taking. Both girls stood in their wardrobes while I took photos, Mackenna even has a place to hide. I'm going to take the kid's back this afternoon, we'll get a better look and we won't get in the way of the plasterers.

Mackenna hiding in her cupboard.
Viveca in the corner of her cupboard.
Its really good to see the house taking shape. Now when you walk in you're starting to see how things are going to look when the sun is shining through the window. Yesterday, the kitchen area was a little dark in the morning so I'll probably have to turn a few lights on every morning but I'm sure we'll work through all these issues not long after moving in.

So here's hoping that everything runs to schedule and the house is finished within the next eight to ten weeks. I can then start unpacking all our stuff, finding a place for it and then going about making this house a home.

Megan

Monday, 26 March 2012

POP CORN CAKE

On Friday Caelan went off to school and he celebrated his birthday a day early with his class. During the months of February and March there has been a number of birthdays every week so the kids have eaten numerous cupcakes. What we didn't realise was that E was also celebrating her birthday on Friday. So it funny how both children arrived with non tradional cakes. E handed out Easter eggs while Caelan arrived with a Pop Corn Cake.
I got the idea while looking at a few of my favourite blogs and as luck would have it I hadn't visited Brown Paper Packages in a while and that's when I saw Kierste's post. I then jumped on Pinterest and added it to my 'favourite receipes board'. The recipe was really easy to follow the only thing I needed to do was convert a few of the ingredient requirements because its an American recipe. I also waited until as late as possible to make the cake because I didn't want the popcorn going stale.

The Popcorn Cake that went to school.
So having followed Kierste's instructions there is only one thing I'd change about the entire process. The recipe asks you to melt the marshmallows with the butter, then stir it through the popcorn and lollies. I would recommend reducing the amount of butter to a knob of butter so that it just coats the pot and then the marshmallow shouldn't stick. My other piece of advise is to work quickly as the marshmallow needs to stay soft while its been mixed together.
I was able to feed 30 people with this cake, I didn't give large portions because of the sweetness of the marshmallows. Each child loved that they got a lolly and popcorn all in one.
Megan

Wednesday, 21 March 2012

We're moving in....

The kids and I visited the block around lunchtime and when we drove into the street we saw cars everywhere. I did a quick count there was 14 utes, vans and small cars in and around our street. The children have never seen that many cars in our future street. The only problem was I ended up parking very close to one of my neighbours driveways and they came home just as I was getting all the kids out of the car. I had a quick meeting with the electrician because I felt I needed to add an extra power point and to move another power point. While I was there the boys had a talk with me about the lighting in the hallway, they thought I'd need an additional light due to a beam in the hallway that will create a dark spot. I agreed even though I really had not idea.

So with 14 cars I did a quick walk round to see who was there. We had 6 electricians, 3 roofers and 5 brickies all on site. I took a few photos as I didn't want to get in their way and I wanted the kids to get back in the car quickly as the rain was setting in. I'm going back on Thursday afternoon as the brickies will have finished by then.
Driving into the beginning of the street before turning.
Going into our street.
Mark rang me earlier today to run through the schedule, the tiler is coming on 6th April. Mark and I realised that this would be Good Friday so we'll have to wait until the 10th due to Easter and the public holidays. The fun part now is that I have to transport the tiles to the site and then conduct an hour long meeting with the tiler minus the kids. This should be fun especially as Tuesdays means that 3 children are at home with me, hoping Mr Opoes can help me out!
Near the Kitchen.
Looking out the the Garage into the yard.


On Friday I should have some more pictures to share with you, it'll be more bricks but I'm hoping you'll get to see the entire front, back and sides done so you can see how the bricks,roof and window frames all come together. The downpipes might even be done by then.

Megan