The adventure of trying to make a house a home that we built for our family of six plus some craft, home décor, recipes & any family fun we might have.

Saturday, 14 April 2012

'Can you tell me how to get, How to get to Sesame Street'

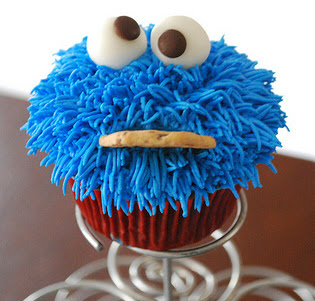
A very happy Cookie Monster.

This one is my favourite.

I found these cupcakes while looking at Pinterest, I thought that they'd be really simple and the kids would love eating Cookie Monster cupcakes at the conclusion of my 5 DAYS OF CUPCAKES. And secondly I've decided to start collecting ideas for Quinlan's 1st Birthday cake and I thought that I'd do something totally different and have cupcakes instead of a large cake that we end up still eating two weeks after the event. So after many late nights, trips to Sugarland and endless Google searches. I found a site that gave me the most confidence. After reading Jessie's post on 'How to make Cookie Monster Cupcakes' over at The girl ain't right I decided on trying out two different techniques to see which one worked best.

The first option is to cut a slit in the cupcake for the biscuit to sit in Cookie Monster's mouth. Option 2 is to ice the entire cupcake, cut the biscuit in half and press the biscuit into place. Both options are easy, neither takes too much time to complete. I'll show you the completed cupcakes that way you can decide if you really need to lose that section of yummy cupcake.

Due to the technical problems I experienced this week I used Green's Vanilla Cake mix instead of making my own cake. I changed the cooking time and added grated chocolate to the cake batter. You can use any flavoured cupcakes you like for this recipe so choose your favourite and get cooking. I cooked mine for 20 - 25 minutes.

OPTION ONE
Start with said cupcakes.

Using a sharp knife cut out a small section so your biscuit will fit.

I bought a tube of Wilton royal blue decorating icing. I attached my star nozzle and I started piping. I now know why you pay so much for decorative cakes, its so time consuming. Insert half the biscuit into the hole.


Use some stiff butter icing, stick your small chocolate chips onto your white chocolate buttons.

Place these into the cake and you have now finished your first Cookie Monster Cupcakes.


OPTION TWO
Start with said cupcakes.

Using the tube of Royal Blue decorating Icing by Wilton pipe the icing onto the cupcake in a star pattern, making sure you go close to the blue paper wrapper and that each star is close together. As stated above this is a time consuming process and depending on the number of guests I'd allow for a few hours just to complete this task alone. Insert half a chocolate chip biscuit in the icing.

Stick a chocolate chip onto a white chocolate button using some white icing and then place this just above the biscuit. Cookie Monster's eyes don't have to be perfect because he does go crazy when the cookies are around.

Either method will require you to do a heap more. Although the piping is wrong on these guys they look really good and it wasn't too difficult to do. If you are making these the night before a birthday party I'd insert the biscuit just before you bring out the cake otherwise the biscuits become soft. I'd also say that I thought option 2 looked better but when you put them side by side its difficult to tell which is which and believe me the kids aren't going to care.
My finished Cookie Monsters.

You know you've done well when the kids are willing to pose for a photo before they have even eaten them. This picture was taken just after their first bit and from the looks on their faces they are happy to be going to Sesame Street.

I think I'll make a few of the Sesame Street characters for Quinlan's first birthday. I've learnt that I'll need to get organised so that I have enough time to decorate each one and I'll need to find a cheaper alternative to the icing I used today. Although it was the perfect colour it worked out to be $1.75 each just for the icing, no wonder cupcakes are expensive.

Hope you have fun looking at my cupcakes and I hope you have more success than what I did.

Megan

Friday, 13 April 2012

5 DAYS OF CUPCAKES

So my Internet is up and running again after been offline all day. I even went to the library to see if I could use there computers but with it been school holiday's no such luck, also very hard to blog on a desktop with four kids who wouldn't sit still for 5 seconds.

So if you come back on Saturday I will have my final cupcake post.  While I've been offline Gina over at The Shabby Creek Cottage has been hosting her weekly link party and I noticed that heaps of people are making cupcakes and they are posting about it. So I thought I'd show you some of the beautiful cupcakes that I've found online lately.


Homemade Peanut Butter Cups can be found here

How cute are these Rubber Duckies you can find the recipe here

These cupcakes would be great of a summer get together

How good are these Hello Kitty cupcakes find the here

So I will see you tomorrow with my last cupcake I promise. Here's hoping everything works out for me. Enjoy your day.

Megan

Thursday, 12 April 2012

Couldn't be Saved - Strawberry Yoghurt Cupcake

I'm having one of those days, nothing seems to be working in my favour today. I went to pick up our wet area floor tiles and guess what they're still in Sydney. So after many telephone calls I now know that they'll be on the next shipment that's arriving on 18th April. The tiler isn't happy, neither are we and I'm sure that when our building supervisor contacts me he'll be upset as well.

So what other things made my day difficult. The cupcakes didn't worked. They failed miserably. They looked uncooked and as I'd made them previously I was really disappointed. So the moral of this story is don't change the fruit component of the recipe and make sure you keep all the key ingredients. I changed the apricots for strawberries, I forgot to add the baking soda and I over mixed the batter.

You can go here for the original recipe and make sure you don't over mix them, include all the ingredients and follow the instructions to a tee. Also if you have missed any of the previous cupcake posts you can click on the following links here, here and here to see the recipe.

So take a look at my pictures and see if you can spot the mistakes. If I make these again I'll spend the time following the recipes steps instead of trying to get creative. You learn from your mistakes, so I'll give these ago when we move into the house and I get to use the new kitchen equipment.

Don't laugh, these are the cupcakes I'll present to Mr Opoes. I wonder if he'll take them to work or if they'll just sit in the freezer for the next few months?


They look like little doll beds.
I hope you can join me tomorrow for the most difficult decorative cupcake. I'm hoping that I'll have time to make the cupcakes during the day instead of trying to do them late into the night.

Megan

Wednesday, 11 April 2012

DAY 3 - Mini Red Velvet Cupcakes

Today see's us halfway through our Cupcake Journey, so when I started this I really wanted to try and make Red Velvet Cupcakes. During the last few years I've heard about Red Velvet cakes and I wondered what ingredient made it sooooooooo red. So while I was searching I came across this recipe at 'tasted by two' by Sydney couple Zina and Felix. I was really surprised to find out that the special ingredient was red food colouring, so all this time I'd been missing out on making Red Velvet Cake because I wasn't adding food colouring.

I fell in love when I did an image search for cupcakes. I wanted to make this because the picture looked good, yummy while also looking pretty. The recipe came from Manhattan's well known Magnolia Bakery. When they were in New York they saw a long line leading into the bakery. I'm really grateful that they shared their recipe, this marvellous picture and the story behind how they discovered it.  I was drawn to this picture straight away and I knew I had to try to replicate it. I had to race out and buy a pipping bag because you guessed it mine is in storage. I tired using baking paper and a plastic bag to pipe the icing onto each cupcake but neither method worked. So here's the recipe for these little beauties.

Mini Red Velvet Cupcakes
Ingredients:
3 ¼ cups of plain flour
¾ cup unsalted butter, softened
2 ½ cups caster sugar
3 large eggs, at room temperature
6 tablespoons red food colouring
3 tablespoons unsweetened cocoa
1 ½ teaspoons vanilla extract
1 ½ teaspoons salt
1 ½ cups full cream milk
1 ½ teaspoons cider vinegar
1 ½ teaspoons baking soda

Method:
1. Preheat oven to 175°C. Grease and lightly flour 2 cupcake pans.
2. In a small bowl, sift the cake flour and set aside.
3. In a large bowl, cream the butter and sugar on a medium speed until its very light and fluffy, about 5 minutes. Add the eggs, one at a time, beating well after each addition.
4. In another small bowl, whisk together the red food colouring, cocoa and vanilla. Add to the creamed mixture.
5. In a measuring cup, stir the salt into the milk. Add to the batter in three parts alternating with the flour. With each addition, beat until the ingredients are incorporated, don't over beat.
6. In another small bowl, stir together the cider vinegar and baking soda. Add to the batter and mix well.
7. Using a rubber spatula, scrape down the batter in the bowl, making sure the ingredients are well blended and the batter is smooth.
8. Divide the batter among the prepared pans. Arrange the oven racks in the upper and lower thirds of the oven.
9. Bake the cupcakes, switching positions of the pans halfway through baking, until a tester comes out clean, about 20 minutes.
10. Cool the cupcakes in the pan 10 minutes, then remove from the pan and cool completely on a rack before icing.


Cream Cheese Frosting
Ingredients:
300g cream cheese (spreadable cream cheese or mascarpone are both fine)
1/3 cup unsalted butter, softened
1 teaspoon vanilla extract
2 cups icing sugar, sifted

Method:
1. With an electric mixer, blend together cream cheese and butter until smooth.
2. Pour in icing sugar, salt and vanilla extract. Turn mixer on high and beat until light and fluffy.
3. Fill a piping bag with icing and spread over each cake. Big and swirly is the key.

They look pretty. The kids and adults will love them. They are worth the wait.


So if you missed the previous cupcakes you can find them here and here. Come back tomorrow and you'll get to see my Strawberry Yoghurt Cupcakes.

Megan

Tuesday, 10 April 2012

Date cupcakes - why did they fail

So I thought I'd give you an update on the Mini Easter Egg Surprise Cupcakes that I made yesterday. I was really happy with how the cupcakes looked, how they photographed and how they tasted. The only negative aspect was that the Easter Eggs sank to the bottom of the tin, this made it quite difficult to remove them from well greased cupcake tin. In the future I'll use cupcake cases and if I want to make these cupcakes again at any other time of the year I'll use different lollies e.g. Jersey Caramels or Rollo's instead of solid Easter eggs.

So my cupcakes today have been inspired by Mr Opoes's favourite dessert 'Sticky Date Pudding' minus the butterscotch sauce. I knew Mr Opoes would like these however I had to look into what type of icing to use because the butterscotch sauce would be too heavy.

I found the recipe I wanted to use on a whisk & a spoon. Stephanie's blog has beautiful images, easy to read instructions and although the pictures are intimidating she uses everyday ingredients. I did make a few changes to the recipe because I wanted the cupcakes to be a mixture of the pudding and the cupcakes. So here's a picture courtesy of Stephanie's blog of what my Date Cupcakes should look like.
This looks delicious I'm thinking you could dust
each of them with icing sugar.
I haven't added any of my own pictures because I made mistakes while I was making these. My little girl picked up some type of tummy bug and I was concentrating more on her than on what I was doing. So my apologises but at least you can have a look at Stephanie's yummy picture above to get an idea of what the cupcakes should have looked like.

Date Cupcakes with Buttermilk Fudge Icing
Ingredients:
200g pitted dates, coarsely chopped
1/2 cup of boiling water
1/3 teaspoon bicarbonate of soda
5 tablespoons unsalted butter, room temperature
1/4 cup brown sugar, packed
1/4 cup caster sugar
1 large egg, at room temperature
1 cup self-rising flour
1/3 teaspoon baking powder
pinch of salt
pinch of nutmeg
1/3 cup of buttermilk

Method:
1. Preheat the oven to180°C. 
2. Line cupcake pan with 8 regular sized paper liners.
3. Place dates and water in a medium saucepan over a high heat. Bring to the boil. Stir in the bicarbonate of soda. Set aside for 10 minutes to cool slightly.
4. Cream butter and both sugars for approximately 5 minutes or until light and fluffy. Add the egg and mix well.
5. In another bowl, sift together the flour, baking powder, salt and nutmeg.
6. To the butter and sugar mix add a third of buttermilk and a third of the flour mix. A start with the buttermilk and finish with the flour mixture. Mix lightly until blended.
7. Fold the date paste into the batter with a rubber spatula.
8. Divide the batter among the cupcake cups, filling each one to 3/4 full.
9. Bake in the middle of the oven for 20 - 25 minutes or until a skewer comes out clean.
10. Cool for 10 minutes, remove from the pans. Cool completely on a wire rack before icing.

Buttermilk Fudge Icing
Ingredients:
1/2 cup caster sugar
1 1/2 teaspoon light corn syrup
2 tablespoons unsalted butter, cut into small pieces
1/3 cup buttermilk, plus an additional 1 tablespoon, for thinning the icing
1/3 teaspoon baking soda, sifted
1/4 teaspoon vanilla extract

Method:
1. Combine the sugar, corn syrup, butter, buttermilk and baking soda in a large heavy-bottomed pot.
2. Stir over medium heat until the sugar dissolves. Increase the heat slightly and bring to the boil. Stir one last time as it comes to the boil, then DON'T STIR AGAIN.
3. Boil the syrup until it reaches 118°C on a candy thermometer (soft ball stage). Pour immediately into a mixing bowl and allow to stand for 5 minutes.
4. Stir in the vanilla, then beat on a medium speed until thick enough to spread, about 5 minutes.
5. If the icing is too thick, add the additional buttermilk, one teaspoon at a time.
6. Cover the tops of the cupcakes with the icing and cool before serving. Refrigerate to set the icing if it seems loose.
NOTE: If its too loose to work with, you can try chilling it for 10 minutes or so and re-whipping it before covering the cupcake top.

If this all seems to difficult just dust each cupcake with a little shifted icing sugar and serve. Remember to enjoy these cupcakes especially with the amount of time you have spent making, baking and icing them. I hope that your efforts pay off especially when mine didn't work.

Megan

Monday, 9 April 2012

Mini Easter Egg Surprise

After the kids had their annual and rather small Easter Egg hunt in Grandma and Grandpa's backyard I had 12 small Easter Eggs left. Not long after marrying Mr Opoes I found an Easter egg inspired recipe that I was meaning to try. As everything we own is in a storage shed I thought I'd have a go and try to remember what I'd read years ago. I've also seen a heap of rainbow cakes on Pinterest and other talented peoples blogs so I thought I'd try to create the layered rainbow effect instead of having a marbel cake effect. I ended up only using three colours (white, purple and red) to create my Mini Easter Egg Surprise Cupcakes. I have since learnt that the Rainbow Cake to made up of several coloured layers of cake that are then joined together with frosting.
So here is the recipe I used to make my cupcakes. I wanted to see if I could make the batter a little more creamer so I added 1 tablespoon of vanilla yoghurt and 1 tablespoon of apple sauce. I used the apple sauce as it add sweetness, I reduced the amount of brown sugar to ½ a cup because of the apple sauce. If you aren't using apple sauce still use ¾ cup brown sugar.

Easter Egg Surprise Cupcakes
Ingredients:
125g unsalted butter, softened
¾ cup brown sugar, firmly packed
3 eggs
1 teaspoon vanilla extract
1 ½ cups plain flour
1 teaspoon baking powder
¾ cup milk 
12 solid chocolate Easter eggs, foil removed
blue food colouring
red food colouring

Icing:
50g unsalted butter
2 cups icing sugar

Method:
1.  Preheat oven to 180°C.
2.  Using an electric mixer, beat butter for 2 minutes until pale in colour and creamy. Add sugar one third at a time, beating well between each addition. Add eggs one at a time, beating for about a minute between each addition. Add the vanilla essence and beat until combined.
3.  Add half the shifted flour and baking powder to the butter mixture. Then add half the milk to the butter mixture. Mix well.  Repeat with remaining flour and milk. Mix the batter well until its well combined.

4.  Divide the cake mixture into three separate bowls. Add the desired amount of food colouring to two of the bowls. Make sure that the colour is stirred through the mixture really well.
5.  Spoon 1 tablespoon of vanilla mixture into each cupcake holder. Place the Easter egg in the centre of the cupcake pan.

6.  Using the two remaining mixtures spoon them over the egg. Fill each greased cupcake pan so that its ¾ full (an ice cream scoop is perfect for this).


5.  Bake muffin size cupcakes for 20-25 minutes and mini cupcakes for about 15 minutes or until a skewer inserted into the middle of a cupcake comes out clean.
6.  Transfer to wire racks and allow to cool completely.

Icing:
1.  Cream butter and icing sugar until pale and smooth. Beat until well combined.
2.  The mixture should be light and fluffy. The mixture should be a spreadable paste; if it is too dry add a little bit of milk, if too wet add more icing sugar.
3.  When the cupcakes are cold, generously spread icing over the top. Alternatively, you could pipe the icing onto each cupcake. Decorate as desired.

The finished cupcake with hidden Easter egg.
Megan

Sunday, 8 April 2012

5 days of Cupcakes

Recently I started sharing some of my recipes on various link parties and the lovely Carolyn from Homework featured my 'Yoghurt and Apricot Cupcakes' on her Inspiration Pinboard Springtime Cupcakes. So now I have the privilege of putting her featured button on my blog for all to see. Yah. I'm so happy because there are people out there beside my family who are looking at what I'm doing, they are liking it and I'm getting a pat on the back. So thank you Carolyn.

After this happened I decided that I'd save you from all the boring building things that are happening and I'd do '5 Days Of Cupcakes' starting on Monday. So because it's Easter and chocolate eggs are all the rage I'll start with an Easter egg inspired cupcake. To enable these cupcakes to be used in school lunches there will be a couple of mini cupcakes, large one for hubbies' lunch or morning tea with friends and lastly I try to make a large cupcake that's suitable for a birthday party.

Here is what I'm planning to do during the next five days.
Monday:                  Mini Easter Egg Surprise
Tuesday:                 Date Cupcakes
Wednesday:           Red Velvet Mini Cupcakes
Thursday:               Strawberry Yoghurt Cupcakes
Friday:                     Cookie Monster Cupcakes

I'm going to show you the good, the bad and the ugly. I'm still learning how to use this gas oven and when we move into the new house I'll have another gas oven to learn how to use. I'm hoping that by using this older model gas oven I'll be an expert when we move into the new place. My plan is to get the cooking done the day before, ice them after the kids go to bed and then write up my blog before posting it the next day.

That's the plan whether or not it works out that way I guess we'll have to see. I'm sure that babies will need feeding, nappies will need changing and then there's things that might happen with the build. I know I have to meet with the tiler but that'll only happen after he contacts me.

Here are some really beautiful cupcakes. Leave a comment and let me know what cupcake you or your family like the most.

find the recipe here


 find the recipe here

So I'll see you tomorrow with the first of my cupcake creations. I hope you are having a safe, happy Easter and I'll see you tomorrow with my Mini Easter Egg Surprise.
Megan